Showing posts with label DIY. Show all posts

Friday, July 20, 2012

Autumn Wreath

Ok, so a few things today :)

First of all...tomorrow is my FIRST EVER GIVEAWAY!!!!! Make sure to stop by tomorrow morning to find out how you can enter and win my first giveaway!!!!

Second, I finally started a full time job this week! I've worked twice which has been nice, but it also means I may have less time for blogging. I'm one of those people who likes to plan ahead, so hopefully I can stay pretty regular with posts by getting prepared on my days off. I am terribly sorry if I start slacking, but as you might have seen in an earlier post, I don't make money from this blog, and while I do really enjoy having it, I also have to help my family pay the bills. I'm sure you can relate.

Alright, with that being said, today I am sharing something sort of random. It doesn't really fit with the season, BUT I've been on a big wreath kick on Pinterest. You can check out my wreath board and leave me suggestions or links to other awesome wreaths, or wreaths you've done :) Anyway, the only wreath I've ever made was a nice fall one, so I am excited to get started making some inspired wreaths from Pinterest. It is surprisingly easy to make a wreath, so that is at least happy! Check it out!


So, you just need a wreath from the store. I'm not exactly sure what this kind is called, but it looks like it's made with twigs basically. The other items I got were dried flowers, raffia, and some decorative items from the fake flower section of Michaels.


I arranged the flowers and accent items in a way that I found appealing and then tied them all together in a nice loose arrangement. Then I glued that arrangement to the wreath itself. I then use the raffia to make a nice little bow which looks way nicer than string, and tied that around both the wreath base and the flowers.My last step was to glue the three flower heads onto the bow for a nice final touch.


I know we don't all have the same tastes, but I hope this can at least inspire you to get creative on a wreath for fall. It will be coming up before we know it! It's already almost time for school to start, so get a jump start on your fall decorating so you will be prepared when it actually gets here!!

Have a great day!


I Heart Nap Time


Wednesday, July 4, 2012

Bridal Shower Invitation

Hello! I finally have something fun and new! I've been working on creating a bridal shower for my dear friend, and I just sent out the invitations. Originally I wanted to have a pink and gold shower, but that got changed, so now it is just "girly" themed I guess. The first thing I've done for the shower is to make invitations and check out the fun ones I made for her!


This is the completed invite. Nice and simple, but really cute too! I also plan on making a cookie and cupcake (or maybe cake pop) for each person as a favor and the prizes for the games are beauty bags. I will definitely be posting as I go since the shower is just a few weeks away! If you are interested in making a similar invitation I found the format here. Then you just fill in the colors and words, and it is finished!

Here is a fun picture that matched my owl, so I thought I'd share :)


Friday, June 1, 2012

Running

I really enjoy running. This is not something I would have EVER thought I'd say when I was younger. In fact, until about three years ago I never would have thought I'd say that. When I was little I was pretty overweight, then I started dancing. Dancing was my passion for years, and it still would be if my hips weren't so bad, and it wasn't so expensive to keep up with classes. I still love watching So You Think You Can Dance, and love watching dance recitals and ballets, but running is my new exercise hobby.

It all started when I went away to graduate school. I no longer had a large school with a dance team I could participate in and definitely didn't have the money with tuition and housing to take classes. I moved out to California for graduate school and since running was cheap and easy (and the weather was forever nice in CA) I thought I would try it out. I started out easy and found the Couch to 5K running plan. It was awesome! It was so easy to follow and built up nice and slowly so it didn't kill you. I loved it and when I finished I didn't know what to do with myself until I found a 10K plan. I continued with my running to try a 10K running plan, but was somewhat skeptical I would ever actually be able to run over 6 miles. As it turns out, if you train, it really isn't all that terrible. Again, saying all this as someone who had NEVER run before in my life. Dance is so much different than running because while practices are long, you only actually put your all into a 3 or 4 minute time period. So, learning to sustain your energy is a big transition.

As I began my running journey I learned that people I went to church and school with were also interested so we started running together and I got a lot of my friends going with the whole idea of running. We started running in groups and finally decided to train for a HALF MARATHON. That's right people, a half which just so happens to be 13.1 miles. I mean, that is double what my 10K training would have required me to do, but I jumped on the band wagon anyway. I posted my schedule on my wall and began training. I ran for a year straight with a very regimented schedule of four days a week with my long run on Saturdays and doing weights after my runs. I did it, I never ran a half because I never wanted to pay for it, but I trained for it and I did it.

When I moved home, I slacked a bit on the running. Let's be honest, I slacked a lot. Moving from California to Indiana is quite a move and it takes A LOT of time and energy and for a few weeks before hand and the few weeks after I moved I hardly worked out at all. I knew I needed to because I felt blah. When I was running I felt awake and healthy and overall happy and as excited as I was to move home to my friends, family, and boyfriend I still knew I needed to work out. So, I finally started sort of working out again, but not a ton of running because the humidity is awful then it was because it got so cold and so I would do work out videos instead. Those are great, but they just aren't the same. Before the wedding it started to warm up and I did start running again with the dog, who loved it. I always walked him before, but he really just loved running. I knew that it was something I really wanted to start again.

Now I get a new beginning again. I get to start a schedule in my new life and I have plenty of time since I don't have a job yet. I don't want to injure myself because there is no better excuse than that to stop working out so I am starting from scratch. I'm doing weights everyday and doing a Pooch to 5K running plan so I don't kill myself or the dog! I did start on the 3rd week since I had been doing a little running and wasn't completely starting over so to say. Now I am not only doing for myself, but I have a running partner again. Buchanan loves going on his runs. He knows that when I pull out his running harness it's time. He sits still to put it on then goes and sits by his leash until I put it on him. I am excited to be starting again and hope that if you live in the Des Moines area and want a running partner you will let me know OR keep me in check via comments. I want to stick with it and maybe actually run a half marathon now that we have an income and I'm out of school :)


This is Buchanan...come ON mom! The harness is on, let's not take pictures, let's GO! :) He is annoyed haha Don't worry though, we left one second after that. Let me know if you are interested in running or running programs I'd love to help!!!

Basket Flower Arrangement

Today I am going to show you how to do a fun flower arrangement. This one is particularly fun because I made it in a basket. I maybe should have shown this at Easter, but it's still spring, so that's close enough. This also might have been a great idea for a mother's day gift, but you live and you learn :) The most challenging part of this arrangement is preparing the basket. The shape I used is the triangle which you can get more basics about here.


Let's get started. In order to prepare the basket  you must 1) get a piece of foam that fits your basket and 2) find a plastic liner that fits in the basket as well. Once you find these two items, you are ready to go!

1) Place the plastic liner into your basket, make sure it is in there securely, use water proof tape if necessary. Mine fit in just right, so I didn't need anything to help hold it down. Then soak your flower foam, and place it into the plastic lined basket.

2) This is the easy part! Just follow the triangle method for flower arranging. Place your three largest pieces of foliage first. These pieces will be the three points of the arrangement. The tallest in the back and then the other two pieces on either side sticking out making the triangle shape. Don't forget to angle these forward a bit to give the piece depth.

3)The next step is to add in the foliage that will fill up much of the space left over. The first pieces that will be placed will fill in the framework shape of the triangle. I started with the back and moved forward. Cutting my pieces shorter and shorter as I went to make the triangle effect. Then slowly fill in the central piece of the foam. The piece will look like an outline and then to give it depth I fill in the front portion of the foam.


4) It is finally time for the flowers! Now is when you fill in the leftover spaces. Again, start with the biggest pieces. In this piece it is the large pink flowers in the back. Once those are placed then use your side pieces to go from the back point to the two sides (don't place the front flower yet) making a line down each side. The flowers should make a triangle shape without the bottom line.


5) The next flowers you will place are the focal flowers. In this arrangement they are the large white flowers. I chose to make my focal point to the side this time. I don't like complete symmetry, so an off center focal point is something I enjoy. You can make yours wherever you would like. Once you pick a good spot for those, make sure one is facing almost completely forward, and the other is more angled toward the ceiling a bit. 


6) Now it is time for front and filler flowers. The first of the last flowers you will place is your front row. I waited to do this until after the focal flowers so that I didn't crowd the front. I used multiple types of flowers to fill in the front and empty spaces because I like the pop of different colors, especially in the spring and summer. Just make sure when you use different colors that you are spacing them out from one another so there isn't a clump of one color, except for the focal flower.


7) The last thing to do is add any ribbon you would like and to check all sides and angles to be sure you don't have any holes or weird spots. Let me know if you have any questions or check out my intro to flower arranging. This will help you with color schemes and the basics of shapes, lines, movement and other important aspects of flower arranging! Enjoy :)


Friday, May 25, 2012

Button Bobby Pins

As our last days in Indiana grew near, I had to find some quality hang out time with my friends before we left. So, we decided to have a craft day! I love doing crafts, and using stuff around the house to make something new. So, that is just what we did! My friend Sarah and I both have lots of antique buttons from our grandparents, so we got those out along with some thread, glue, and bobby pins. We had seen a couple of pictures on pinterest of bobby pins with buttons on them. We figured it couldn't be too hard, so we got started. First we collected which buttons we liked and began placing them in cute little patterns. Once we decided how we wanted our bobby pins to look, we glued the buttons together and sewed them to the bobby pins. It was super simple and look how great they turned out!


We sewed them to the actual bobby pin and then glued around the thread to help keep in in place because it is a little wobbly with just the thread. Also, be sure to wrap around both sides of the bobby pin so that it stays in place better, otherwise it has a tendency to want to rest on the side of the bobby pin. If you try this, you will know what I mean :) Anyway, check out the bobby pins I made in just an hour!


Wednesday, May 23, 2012

Basic Spring Bouquet

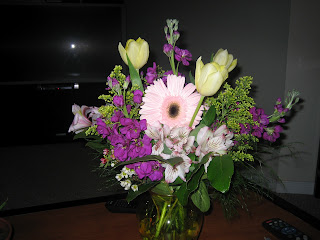
So, last week I showed you how to make a triangle arrangement. It was a little bit complicated, but this week's demonstration is far simpler! This week we don't need a base or extra materials. All you will need is flowers, a vase, and water :)

Let's get started! The first thing you need to do is decide your color scheme. I used a complementary color scheme with yellows and purples, they seemed fitting since it was close to Easter. Once I had picked my flowers (tulips, gerber daisies, alstremeria, just to name a few) I began my arrangement. This one is strangely easy, yet it almost seems without skills. However, you do need to make sure you keep your bouquet balanced and to scale.

You will begin by gathering your foliage in your hand. Then add in the flowers to your fist bouquet. One thing to keep in mind if you use similar flowers is that tulips keep growing in water. You can see that mine are longer than the rest of the flowers, so cut them a bit shorter than the rest of the stems. Once you have gathered all the flowers you want into your fist, place them into the vase and let them fall naturally. This  gives a very natural, fresh picked spring flowers kind of look.


This is one of my very favorite flower styles. It looks so beautiful and is easy to do! Let me know if you have questions :)


Friday, May 18, 2012

Triangle Flower Arrangement

Alright, last week we got started with the basics for flower arrangements and care of flowers. This week I will show you how to start getting them into actual arrangements for your home!! I have quite a few different styles to show you, so I will do about one a week probably! This week is the triangle arrangement :)


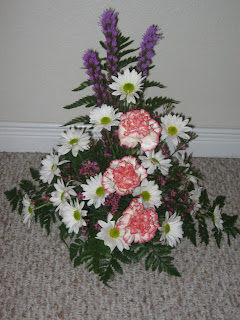
This type of arrangement is really versatile. It can look really fancy or it can look friendly and fun. Usually the triangle arrangement is set up symmetrically. Even when an arrangement is symmetrical, the flowers shouldn't be exactly the same on both sides. As you can see in the picture above, the flowers are shaped in a triangle, but each side is a little different.  Let's get started!

1) Prepare your container. One of the most important parts to your arrangement is having a good base. I used a round base with a water soaked piece of floral foam. The foam can be found at any local craft shop and even wal-mart, I believe. Place the foam in water until it has become full of the water. Then shake a little excess out and place into the container. You flowers will be thirsty after all their hard work.This provides plenty of water for the arrangement, and a solid base. I used waterproof tape to help keep the foam in place. 

2) To begin the actual arrangement, first choose what you want to use for the foliage. The first three pieces you put in are the larges foliage pieces. Mine were the tallest foliage in the back and the two long pieces on the side, creating a base for a triangle shape. The back piece needs to be toward the back of the foam, angled back slightly to counter the front pieces. The two pieces on the side were placed in the sides of the foam, toward the back and angled slightly forward. It looks really silly at this point because it is literally just three pieces of ferm poking out for each end.

3) The next step is to add in the foliage that will fill up much of the space left over. The first pieces that will be placed will fill in the framework shape of the triangle. I started with the back and moved forward. Cutting my pieces shorter and shorter as I went to make the triangle effect. Then slowly fill in the central piece of the foam. The piece will look like an outline and then to give it depth I fill in the front portion of the foam.

4) Now we get to use the flowers! The first three flowers to be placed are the three corner flowers. In this arrangement, I used daisies for the corner flowers, you can see the tallest white carnation, and the two on the very far edges, each of these is placed directly in front of the first three pieces of foliage you placed in the foam. 

5) Next, add the two or three focal flowers. My focal flowers here are carnations. I used three pinks and placed them in the center of the piece because they were my largest flowers. Also, notice that the one flower is facing forward, that is the focal point. The other two carnations are facing out and up slightly to draw the eye into the focal point. 


6) Now that the focal point has been established, start filling in! Use smaller flowers to fill in the spaces, placed at different levels and angles to create depth in the piece. This is where the rest of my daisies came in. There are no specific rules to this section besides preference, especially if you are arranging at home.

7) The last part with flowers is to use small filler flowers to fill in the space between and to add a little more color. Don't add too much, the filler flowers can overtake the design, but they are also great for covering up goof ups :)

8) Last, but not least, check all sides of the arrangement, even the back to be sure all mechanical items such s tape are covered up! You want your piece to look great on all sides of the table :) 

A couple other things to think about, I used a analogous color scheme which means 2 or more adjacent hues on the color wheel. It is also symmetrical and balanced well on each side. It contains a focal point, and is proportioned correctly (1 1/2 times larger than the base). Make sure to keep those things in mind as you begin your piece! Good luck!! Check in next week for basic spring bouquet!


Thursday, May 10, 2012

Flower Arranging 101

Hello! So, I decided it would be really fun to do a series on arranging flowers since spring/summer are coming up! There is no better time to know how to arrange a nice bouquet than right before flower season :) Let me just start out with the basics today, and then get on with the more exciting stuff in the weeks to come.

First of all, you might be wondering what my credentials are seeing as my degrees are in neuroscience and psychology and I currently work at a pet store (yeah, I know, looong story haha) Anyway, I don't have any crazy good credentials, but I did take a college course on flower arranging and learned A TON!! It was a lot of fun, so I will share the basics with you. Hopefully, this will brighten your home and cheer up your hearts!


Lets get started!

The first thing you have to do is have a vision. It is the same with any sort of project, you have to have a recipe or a pattern so that you can make what you need. So, here are the basic elements of flower design: form, line, space, texture, and color.  Forms for flower arranging are either open or closed, open arrangements have a lot of space between the flowers, where as the closed form does not. There are also geometric forms for flower arranging which include triangle, rectangle/cube, and circle. We will go over these in greater detail in the future as I show you more about flower arranging.

Line is the way the arrangement "moves." There is either static or dynamic lines in an arrangement: vertical, horizontal, diagonal, and curved. These are pretty self explanatory, and you can probably think of examples of these, even if it is an odd arrangement you once saw at an office of something :)

Space is the area of the arrangement and the area around it. It encompasses positive space which is occupied by material (flowers, foliage, ribbons, etc.) Negative space is the empty area between the flowers, and voids are clean,distinct lines that connect the material to the rest of the design (stems, etc.)

Texture is the surface of the objects you are using. It is pretty self explanatory, a fresh flower is soft and smooth where as a dried arrangement is rough and brittle. You get the idea

The last is color. Color is really important because it can mean a lot of different things. In the flower world, different colored flowers "mean" different things. Also, warm colors move toward you when you look at an arrangement, whereas cool colored flowers fade into the background. If you have questions about the meaning of certain colors, I can answer those for you :) I will not go through them all here. I will probably mention them as I continue in the series explaining different arrangements. The other part about color is choosing a scheme, you can have a monochromatic scheme, with all similar colors, or contrasting colors which range in many different ways, all using the color wheel. For example, a split complementary is one hue and the two colors on each side of its direct complement (aka blue with orange-yellow and orange-red) Make sense? If it doesn't that's okay, you will figure it out as we go!


I will show you this full arrangement later, but we needed a little life in this long post :) Ok, so once you understand the basic principles, the fun stuff comes next!! Next we begin to think about the balance of the arrangement, do we want it balanced or asymmetrical? Do we want one major focal point or just lots of fun flowers all over? This is when the picture really starts to come together, the concept really starts to take shape! Once you answer those questions you must remember that the proportion must be good. This means when you choose a container, the arrangement should be at least 1/12 to 2 times taller or wider than that container. Otherwise, it looks way too huge and could fall over, or it looks so small it is ridiculous. 

There are quite a few other tiny details that you should think about when making an arrangement, but that is really for the professionals. This is just for fun, and if you want more info just let me know and I can help, but for now let's keep it light and fun for the home! 

The last thing I want to talk about today is caring for your flower once they are made. If you know how to properly take care of flowers they last much longer! First of all, when you get flowers you should always cut the stems at an angle underneath running water. The way the stem of a flower is designed, it sucks things into it, and if you do it in the air it sucks in the dirt and pollutants, whereas under water it will get just what it needs! The best preservative for your flowers at home is super easy to make. Just mix 2 cups of lemon-lime carbonated beverage with 2 cups of water. It's that easy! Another is 2 Tbl white vinegar, 2 Tbl sugar, 1/4 tsp bleach, with 1 quart water mixed together. Also easy, but I prefer the one with the pop :) Along with one of these great mixes, changing the water is important as well. This should really extend the life of your flowers. 

One other tip for caring for your flowers is to keep them away from ethylene which is basically aging hormone for plants. You can do this by keeping fresh fruits and vegetables away from the arrangements and keeping them in a fairly cool place because the warmer the flowers are, the sooner they will die. 

That is the basics! Check back next week for our first arrangement we will be learning about which is a triangle arrangement. It's the sneak peek above :) Let me know if you have ANY questions, I will hopefully be able to answer them! Enjoy!

Check out the rest of the series:

Triangle Arrangement

Wednesday, May 9, 2012

Homemade Bath Scrubs

When I was in graduate school, myself and a few other students were really interested in self care. Since we were in a psychology program, we understood the importance of taking care of yourself in order to be a good clinician and preached that to our clients often to help in their treatment for themselves. So, we started a program on the first Friday of each month to help with self care. Each Friday we would have a different wellness event where students and faculty could participate and learn about different forms of taking care of yourself. We did lots of different seminars including self defense, aromatherapy, massages, and the like. One of my favorite weeks was all natural bath and face scrubs. We met in the middle of the day and made little containers full of bath scrubs and relaxing bath mixes. So, I thought I'd share my three favorite mixes that I made. We basically laid out everything imaginable to add to a scrub including epsom salt, lavendar sprigs, oils, oatmeal, fruit, dried flowers, etc. I don't have pictures, but don't let that fool you, they are wonderful! Hopefully, I will be able to make some soon and then I can add pictures!

California Citrus Bath (b/c I made it in California for the bath, creative, right?)

Grated orange, lime, and lemon peels
1 cup oatmeal
5 lavendar sprigs

Mix together all the ingredients in a bowl. Plaice in an air tight container and store in a cool, dry area (or use immediately to relax). When you're ready, throw them in a hot bath and relax for 20 minutes. It feel wonderful!

Oatmeal Exfoliating Scrub

1/2 c milk
oatmeal to make a paste
1 tsp honey

Now this one is great because I have SUPER sensitive skin, so I hate using all the chemically stuff. This didn't break out my skin or make it dry, itchy, red, or any of the above. I loved it! Anyway, just combine the ingredients into a paste, apply to face, gently press into skin and release. Leave it on until it dries, and feels like it's cracking. Rub off gently with a warm washcloth. Wait for a glorious, clean feeling on your face!

Exfoliating Body Scrub

1 c oatmeal
1 handful rose petals
1/2 c honey
1/2 cup epsom slats
1 Tbl warm milk
essential oil of choice ( I chose lavendar)

Blend ingredients in a bowl. Gently massage the mixture all over body. Draw a bath and soak in the tub for 20 minutes, allowing the mixture to dissolve from the body into the bath. Rinse any extra off, then moisturize. Get ready to feel great and relaxed!!

Now, I like to use these and especially the bath mix, with a nice candle and dim lighting. It just makes the experience so much more relaxing and enjoyable. Remember, you can mix it up a little and add things you enjoy to the mix for your own personal touches!

Tuesday, May 8, 2012

Flower Pattern

Today I'm giving you a new knitting pattern! I promised this one back on my headband page. This is the flower I use for my headbands, and it looks really cute. There are lots of flower patterns you can choose from, especially if you can knit and crochet (I don't yet know how to crochet), but this is one I got from my sister-in-law. She is an amazing knitter and taught me this flower pattern. It's really easy, and turns out really cute.


Let's get started.


Knit on size 8 knitting needles

Cast on 4 sts 
Row 1: (RS) Knit in front and back loop of first stitch (increasing one stitch), k3 (5sts).
Row 2: Knit in front and back loop of first stitch (increasing one stitch), p4 (6sts).
Row 3: Knit in front and back loop of first stitch (increasing one stitch), k5 (7sts).
Row 4: Knit in front and back loop of first stitch (increasing one stitch), p6 (8sts). 
Make 4 more petals (casting on the first four sts on the needle holding the prior petals).
Do not cut the yarn after making the fifth petal.
Row 5: Join petals by knitting 40sts. 
Row 6: (P2tog) across (20 sts).
Row 7: (K2tog) across (10 sts).
Row 8: (p2tog, p3 tog, p2tog, p3tog) (4 sts).
Cut yarn leaving a 5-inch tail. Thread yarn onto tapestry needle and run through the four sts. Pull tight and anchor thread. Fasten off and cut thread close to the flower.
Petals of flower may be lightly ironed or block them to flatten them a bit, but usually I am just adding it to a headband, so I sew it flat :)


Monday, May 7, 2012

Headband Pattern

Today I have decided to share my headband knitting pattern with you. Headbands are probably my favorite thing to knit, but I usually do them sort of free hand, so it took some time for me to actually sit down and figure out the pattern. Now, I get to share it with you! One other note: I do make my headbands with flowers, so that post will be up soon :) I have also done bows, buttons, feathers, and some other things. Basically whatever someone wants I attempt to do. This headband was the first one I ever made, and I made it for myself in case it didn't turn out well, but it did! It's black and gold for Purdue, of course, and I love it!


So, here it is!


Directions:
CO 9 st
Row 1 (RS): K1, P1 rib across
Row 2 (WS): P1, K1 across
Row 3: Repeat row 1
Row 4: Repeat row 2

Begin increase
Row 5: Work in rib until center stitch (on this row it is the 5th stitch), kfb center st, continue in rib to the end of the row
Row 6: Work in the rib knowing that you will have two purl stitches next to each other right in the very center of the row--this is fine as you will increase BETWEEN them on the next row. 
Row 7: Work in rib until the center, m1B, continue in rib to the end of the row.
Row 8: Work in the rib pattern
Row 9: Work in rib until center stitch, pfb, continue in rib to the end of the row
Row 10: Work in the rib knowing that you will have two knitl stitches next to each other right in the very center of the row--again, this is fine as you will increase BETWEEN them on the next row. 
Row 11: Work in rib until center stitch, m1F, continue in rib to the end of the row
Row 12: Work in the rib pattern
Repeat rows 5-12 until you have 19-21 stitches on your needle. 
Work in the rib pattern for 4” 
Begin the decrease
Row 1 of decrease (RS): (THIS ROW IS WORKED ASSUMING YOUR MIDDLE STITCH IS A KNIT STITCH AKA AN ODD NUMBER, IF IT'S A PURL STITCH, DO ROWS 5-8, THEN 1-4) Work in rib until 2 stitches before the center stitch, k2tog, pfb (this is the center stitch), k2tog, continue in the rib
Row 2: work in the basic rib pattern knowing that you will have two knit stitches next to each other in the very center of the row
Row 3: Work in rib until the two center stitches, p2tog, continue in the rib pattern
Row 4: Work in rib pattern
Row 5: Work in rib until 2 stitches before the center stitch, p2tog, kfb (this is the center stitch), p2tog, continue in the rib 


Row 6: work in the basic rib pattern knowing that you will have two purl stitches next to each other in the very center of the row--this is fine as you will knit the two of them together on the next row. 
Row 7: Work in rib until the two center stitches, k2tog, continue in the rib pattern
Row 8: Work in rib pattern
Work decrease rows 1-8 until you have 9 stitches on the needle. Then just bind off leaving a 4" tail on the end so that you can sew the ends of the headband together.

I then add a flower to the headband, which you can find here. I knit the flower, then sew it onto the headband wherever it fits well! 

Ask if you have questions.


Sunday, May 6, 2012

Planning a Wedding, pt 5- Centerpieces

For my wedding, I wanted something vintage looking, but also something that displayed our personalities and interests. After browsing around pinterest and the internet I finally came up with something that I thought would do both of those things. The items I chose were books, old bottles, and lanterns. Now, the books in my mind needed to look old, with hard covers and minimal pictures and the bottles and lanterns needed to be old. As I continued in my journey of searching for ideas, I thought it would be fun to make the table names author names instead of number and try to match the books with the author names. Here is how they turned out!


These turned out exactly as I had hoped! They were old looking, simple, and reminded me of us. They were also very simple to do! (and cheap) The books were all borrowed from friends and family, with a few exception of books we thought looked cool at thrift/antique stores which are now used for decorating at our house. We basically spent less than $5 on the books. The lanterns were a little trickier because not many people have old looking lanterns, but we did find quite a few from friends and family and only have to buy about ten ourselves. We began perusing thrift/antique stores months before the wedding and found one here and there, and just made sure to stop and look each time we were near a store. We probably spent only $30 on lanterns all together, they are actually a pretty good deal at thrift stores ranging from $2-$10. Now the bottles were lots of fun, we had friends and family with lots of old bottles and mason jars which was extremely helpful and the rest we found at thrift stores like everything else. Glass bottles were a bit more expensive, but much easier to find. I had no idea when we began looking that bottles that they could be collector's items, so we had to be careful when looking not to pick out the expensive ones. All in all, I'd say we spent another $30 on the bottles as well. Doilies were the same way, except our families had them all. So, overall we spent under $100 on our centerpieces for 24 tables! That is a bargain, I must say :)


When choosing flowers, I told the florist to just give us stems of flowers matching the bouquets, and we would arrange them ourselves. I just wanted random arrangements of flowers, nothing super fancy because I like the more freshly picked, thrown in a bottle look, than an arranged look. 

So, once all that was planned and I had collected all my items. I arranged and rearranged everything I had into the centerpieces I liked, made the table names and tied them to random objects in the centerpieces. The last thing (and most helpful) I did was to take a picture of each arrangement and place the picture in a plastic bag with all the items necessary to create that centerpiece. That way, the day before the wedding when we went to set up, everyone could help. I also made a chart indicating where each table went. We literally set up all the tables, put water and flowers in all the bottles in less than two hours. It was so fun and quick, and no one got stressed out which was the best part!!


To see how people found their seats, check out my "escort cards" here.


Thursday, May 3, 2012

Homemade Dog Treat Basics

One thing I really love is animals. I have always loved animals, and in fact, I used to want to go to veterinary school. I'm not really sure when I changed my mind, but at some point I decided I wanted to help people instead of solely animals. Well, as God would have it, I'm back to working with animals. Although my degrees are in neuroscience and I even have my MA in psychology, I was only able to find a job at a local pet store. Apparently, veterinary school would have been far more lucrative than the therapy route haha Anyway, that is besides the point, the point is, I get to work with animals now. Now, it may seem that just working at a pet store doesn't merit much animal knowledge, but since it is a small store, we pride ourselves on knowing a lot about an assortment of animals. One area I know quite a bit about is dog care. I personally have a dog, and have always had a dog since I can remember, and now I know more than ever about caring for my little guy. His name is Buchanan, we call him Buch :)


The more I learn about dogs, the better I can care for my little guy. Buchanan is a very active, sweet, fun, and loving border collie, jack russell terrier mix. We rescued him when he was just three months old, and he will be a year old this month! Time has flown--look how little he was the day we got him, he is twice as big now as he was there:


 I want to make sure that he gets the best life he can and that includes lots of love, playing, exercise, and good nutrition. The hardest part about good nutrition (just like for us) is making healthy taste yummy!

So, here are some basics about dog treats. The first thing that is important to understand is dog nutrition. In order to make a healthy, tasty treat for Fido, you need to make sure your ingredients are good for your little guy. There are a few major items to stay away from: onions, corn, chocolate, and grapes. These are all not good for your dog. Corn will not kill your dog, but they cannot digest it, and so it turns out as waste in your yard, if you know what I mean. Another thing to know about your dog is allergies. If your dog has any allergies (gluten/grains being most common, some protein allergies are also fairly common) be sure to make gluten free treats. I will have some examples later on. Just know your dog, grains aren't bad for your dog, but seeing as it's the most common allergy, just be aware. My dog is not allergic to grains, so occasionally I use good old flour in his treats. I mostly stick with natural, unprocessed food items for his treats, but again flour is something he gets as a special tasty snack (it's like eating candy for us). Something else I really steer clear of is sugar. Buchanan would not be eating white or brown sugar if he were living in the wild, so there is no need for me to add it to his treats now. Some of his favorite treats are cinnamon treats made with no sugar and they smell sooo good I tried one, but they tasted pretty lame to me since there was no sugar, but he gobbles them down. Just because we don't like them doesn't mean they don't :)

So, let's get on with what they do like! Most dogs LOVE peanut butter. I have never met a dog who doesn't. I'm sure he's out there, but I haven't met him yet. Dogs also usually love proteins (chicken, beef, turkey, rabbit, venison, etc.), fruit (applesauce, banana, cranberry, blueberry, etc), and vegetables (spinach, broccoli, peas, green beans, sweet potato, etc.) The next step is getting these items all together into one yummy treat! The easiest way I have found for getting the protein in the treat is to use stock, either chicken or beef just a little added to the treat makes for an extra taste of delicious. The fruits and vegetables can be diced, pureed, or dried depending on what you want to make. 

The biggest key to making a nice crunchy dog biscuit is all in the baking. The way to get that dog bone, super crunchy texture (which is also good for their teeth) is by baking on low heat (usually around 250 degrees) for a looong time (usually 40-60 minutes) Just keep an eye on the treats so they don't look burned. The other great way to make treats is to use the dehydrator. A dehydrator makes 100% natural treats that are guaranteed healthy. Buch's personal favorites include dehydrated chicken and sweet potato! These are both really healthy and fun for your dog (and far cheaper than buying them from the store). Another fun way to make dog treats is freezing them! Buchanan loves ice cubes, and so I thought that making some frozen treats would be fun for him. I just take some plain yogurt (which is homemade in a crockpot, maybe one day I will get around to posting that recipe) and mix it with some of the things he likes such as a little honey, peanut butter, broth, really anything your dog likes and put it into ice cube trays. A little of the mixture goes a long way, and your pup will enjoy a fun treat that is a little more of a challenge. 

I haven't posted any dog treat recipes yet, but once I get around to it, I will definitely link them here! Until then, experiment for your dog (he probably won't judge your baking skills) keep it healthy, and look online for treat recipes (just be careful about ingredient lists before starting)! It is a lot of fun and your dog will thank you for it!


Wednesday, April 25, 2012

Planning a Wedding, pt. 4- Escort Cards

I think I am on a bit of a wedding kick right now. I found out my pictures will be in soon, and some friends posted their pictures from the wedding on Facebook, so now I have some to share. So, back to some wedding planning tips, tools, and ideas! Since I am not a big fan of the traditional, I wanted something creative and different for my escort cards. I also wanted something easy for me, since I was doing so much of my own wedding. Again, to stick with the vintage theme, I wanted something old looking. Luckily, this summer we went to visit some of Josh's family who happens to have a large, old barn that I rummaged through. I had been thinking about using old paned windows, and they had some!! They were beautiful! I loved them, so I stole them for a few months :)


This is how the turned out!! So, to get started you need your windows. These are pretty popular right now, so they might be hard to find, but I have seen them in antique shops and thrift stores around here. Once I got my windows, I chose some paper that I liked for the background. I found this at Michael's in a big book of paper, for only $10!! Now I have tons of extra to use for other crafts, and I used some for the programs, and for other crafts I've done on my blog!

Anyway, before you put the paper in, you must choose who is sitting at which table, which is possibly the most difficult part of wedding planning. Once I figured out who was going where, I typed up the table name at the top of the paper (we used author names) and then wrote all the names of guests underneath. I printed out the papers, and then arranged the lists in the window panes in a visually appealing manner. Since I didn't have numbers, they didn't need to go in any certain order, so I didn't need to print the lists on certain paper to look nice. I used tape to place them in the back of the windows, and voila, I was finished! Easy as pie (besides choosing who went where :), and there are my "escort cards." Again, an easy way to save money, but looked great too!


Speaking of saving money, we got a great deal on our guest book! Since I bought my dress at David's Bridal, they sent me a coupon code for a free guest/photo book. It turned out so cute, and all I paid for was shipping. I liked this idea because I had recently been cleaning out my room to prepare for Josh to move into it, and found old guest books for open houses and the like and had no incentive to keep them. Since this guest book has our engagement photos, we will definitely keep it, it's a two for one! And even better news, we have two more coupon codes for photo books from David's Bridal now that the wedding is over for our wedding pictures! Can't wait to use them :) Now, those are some deals!


Tuesday, April 24, 2012

Planning a Wedding, pt. 3-Wedding Cake Stand

This is another How To for planning your wedding! Since we had a vintage/book theme we used a lot of old stuff for our wedding. One thing that I  particularly enjoyed using was an old chandelier for our cake stand! It was so fun and easy to do!


As you can see above, it turned out really cute!! So, here is what I did! We had been flipping a house before we got married and there was a really ugly chandelier in the dining room.We took it down because it really took away from the room, and I snagged it up, knowing I could use it for something! As the wedding got closer, I realized it could be our cake stand. It worked out so well! We had cheesecake instead of a big cake, so we just put the cheesecake on top of the big part and then after we cut it, we dished out some pieces onto the smaller plates around the edge, and it looked cool! 

The first thing you need to do is find a chandelier. I see these at thrift stores and re-sale shops all the time, so start there. I got lucky since we had one at the house we were flipping. Once you pick one out, you may have to do a little surgery. Mine had tall light bulb things attached, so I had to unscrew the base and then cut these cords that went through them to the base. So, I had to do that six times, once for each of the lights. Once that was done, there was a nice little place for each of my plates to sit. The tall part with the bigger plate was the bottom of the chandelier, so I just had to cut the electric cord from there and it was ready to go. 

Once I got the chandelier the way I wanted it, I spray painted it. I first painted it with a matte black so that the gaudy goldish color wouldn't shine through. Once that was dry, I painted it again with a beige colored crackle spray paint that I found at the craft store. It gave it that old, peely paint vibe that I love. 

And that is all I did!! I just kept it in my wedding room until it was time to go set up the reception hall, and the rest is history. I added some flowers and stuff to the cake table, but overall it turned out great even alone. Here is the final result all close up!