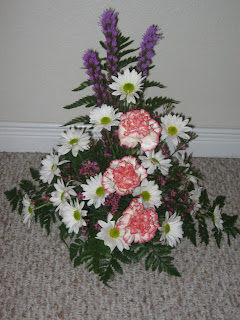
This type of arrangement is really versatile. It can look really fancy or it can look friendly and fun. Usually the triangle arrangement is set up symmetrically. Even when an arrangement is symmetrical, the flowers shouldn't be exactly the same on both sides. As you can see in the picture above, the flowers are shaped in a triangle, but each side is a little different. Let's get started!
1) Prepare your container. One of the most important parts to your arrangement is having a good base. I used a round base with a water soaked piece of floral foam. The foam can be found at any local craft shop and even wal-mart, I believe. Place the foam in water until it has become full of the water. Then shake a little excess out and place into the container. You flowers will be thirsty after all their hard work.This provides plenty of water for the arrangement, and a solid base. I used waterproof tape to help keep the foam in place.
2) To begin the actual arrangement, first choose what you want to use for the foliage. The first three pieces you put in are the larges foliage pieces. Mine were the tallest foliage in the back and the two long pieces on the side, creating a base for a triangle shape. The back piece needs to be toward the back of the foam, angled back slightly to counter the front pieces. The two pieces on the side were placed in the sides of the foam, toward the back and angled slightly forward. It looks really silly at this point because it is literally just three pieces of ferm poking out for each end.
3) The next step is to add in the foliage that will fill up much of the space left over. The first pieces that will be placed will fill in the framework shape of the triangle. I started with the back and moved forward. Cutting my pieces shorter and shorter as I went to make the triangle effect. Then slowly fill in the central piece of the foam. The piece will look like an outline and then to give it depth I fill in the front portion of the foam.
4) Now we get to use the flowers! The first three flowers to be placed are the three corner flowers. In this arrangement, I used daisies for the corner flowers, you can see the tallest white carnation, and the two on the very far edges, each of these is placed directly in front of the first three pieces of foliage you placed in the foam.
5) Next, add the two or three focal flowers. My focal flowers here are carnations. I used three pinks and placed them in the center of the piece because they were my largest flowers. Also, notice that the one flower is facing forward, that is the focal point. The other two carnations are facing out and up slightly to draw the eye into the focal point.
6) Now that the focal point has been established, start filling in! Use smaller flowers to fill in the spaces, placed at different levels and angles to create depth in the piece. This is where the rest of my daisies came in. There are no specific rules to this section besides preference, especially if you are arranging at home.
7) The last part with flowers is to use small filler flowers to fill in the space between and to add a little more color. Don't add too much, the filler flowers can overtake the design, but they are also great for covering up goof ups :)
8) Last, but not least, check all sides of the arrangement, even the back to be sure all mechanical items such s tape are covered up! You want your piece to look great on all sides of the table :)
A couple other things to think about, I used a analogous color scheme which means 2 or more adjacent hues on the color wheel. It is also symmetrical and balanced well on each side. It contains a focal point, and is proportioned correctly (1 1/2 times larger than the base). Make sure to keep those things in mind as you begin your piece! Good luck!! Check in next week for basic spring bouquet!


Great job. I always like to do something with my flowers versus just plopping them in a vase.
ReplyDeleteI have always wanted to learn flower arranging ... thanks for teaching this, I'm learning so much. Just a few questions: "soaked foamed" - what's that mean, soak it in water and use it to decorate while it's wet? (I know, dumb question but I'm a true beginner). Second is to ask if you can do step-by-step pictures, because I'm a total visual learner and need to see it. Better yet, could you hop a plane and come to my house to teach me hands-on? haha - thanks again, Mary
ReplyDeleteI am sorry about that, I didn't do a very good job explaining that at all. So, the foam is flower foam which you can buy in blocks at somewhere like Hobby Lobby or Michaels. Then you just need to let it sit in water until it is soaked all the way through. Pick it up out of the water and let some the extra drip away and then place it in your container. I am still really new to this whole blogging thing, so I am terrible at remembering to take pictures as I go, but I will certainly start to try doing that. Thank you for the suggestion. And you do want the foam wet when you do the flowers it is easier to poke into, and the flowers like drinking it as you go :) Let me know if you have any other questions and I will do my best to answer them!
Delete